Mastering the PowerShell ‘Do While’ Loop for Efficiency
In the realm of scripting and automation, PowerShell stands as a formidable tool, offering a wide array of functionalities to simplify and expedite complex tasks. While seasoned PowerShell users are well-versed in its versatile capabilities, newcomers often find themselves in awe of its potential. Among the many building blocks that make PowerShell a juggernaut in the world of automation, the ‘Do While’ loop is a vital and highly adaptable construct.
PowerShell’s ‘Do While’ loop is a gateway to executing repetitive tasks, a mechanism to ensure that specific conditions are met before moving forward, and a bridge between automation and precision. Whether you’re a sysadmin streamlining system management tasks, a developer automating deployment procedures, or a data analyst processing vast datasets, understanding and harnessing this loop is essential.
Utilizing Loops for Disk Information in PowerShell
In our journey, we harnessed the power of loops to efficiently retrieve and display information about the disks in our system. The loop we employed, known as a ForEach loop, allowed us to iterate through an array of objects, in this case, the $disks collection. Let’s delve deeper into this process and explore the code used:
The ForEach Loop in Action
The ForEach loop is a versatile construct in PowerShell that enables us to work with each item in a collection individually. In our specific scenario, we declared the variable $disk to represent the current item from the $disks array. This loop structure is defined as follows:
ForEach ($item in $collection) { $item.Property }
Here, $item represents the current item within the collection, and we can access its properties using $item.Property. In our case, $disk stands for the current disk in the loop.
Displaying Disk Information
With the ForEach loop in place, we can effortlessly retrieve and showcase detailed disk information. Here’s how we did it:
- Device ID: We used $disk.DeviceID to display the unique identifier of each disk;
- Free Space: By dividing $disk.FreeSpace by 1GB, we obtained the available free space on the disk and formatted it to show it in gigabytes with two decimal places;
- Total Size: Similarly, we calculated the total size of the disk by dividing $disk.Size by 1GB and formatting it accordingly;
- % Free: To provide a percentage of free space compared to the total size, we divided $disk.FreeSpace by $disk.Size and presented it as a whole number percentage;
- Volume Name: $disk.VolumeName allowed us to retrieve and display the name of the volume associated with each disk;
- Drive Type: For this, we used the Get-WMIInfo function to translate the numerical drive type into a human-readable format. This operation was performed for each disk in the loop.
The Versatility of PowerShell Loops
While the ForEach loop was our choice for displaying disk information, PowerShell offers various types of loops, each tailored to different tasks. It’s important to select the most appropriate loop for your specific needs. In PowerShell, you can also use loops like For, While, and Do-While for diverse scenarios.
Here’s a quick reference for the types of loops you can explore:
- For Loop: Use when you know the exact number of iterations required;
- While Loop: Ideal for situations where you want to continue iterating as long as a certain condition is met;
- Do-While Loop: Works similarly to the While loop but ensures at least one execution of the loop’s code block.
A Handy Note
Before we move forward with our PowerShell adventures, it’s essential to remember that running code with infinite loops can be troublesome. If you ever find yourself stuck in an infinite loop, simply use CTRL+C to break out of it and regain control of your PowerShell session.
Now that we’ve harnessed the power of loops in PowerShell, we’re well-equipped to tackle various tasks efficiently and effectively in our scripting journey. Next, let’s explore further PowerShell capabilities and best practices!
Unveiling the Power of the ForEach Loop in PowerShell
If you’re diving into the world of PowerShell, you’re in for a treat with the ForEach loop. This loop is your ticket to effortlessly traversing arrays or collections, giving you the power to manipulate and extract information with ease. So, what exactly does it do, and how can you leverage its capabilities? Let’s explore.
The ForEach Loop Demystified
At its core, the ForEach loop is a workhorse that cycles through each element within an array or collection. It’s like having a dedicated guide to show you around a treasure trove of data. To make it work for you, you define an element or item to serve as a placeholder for the current object in the loop. This element can be customized to reflect the nature of the items you’re dealing with, making your code more intuitive.
Loop Setup – Step by Step
Setting up a ForEach loop is a breeze. Here’s a breakdown of the structure:
ForEach (item/element in array/collection) {
    Do-Stuff
}
Item/Element: This is your chosen placeholder, tailored to the specifics of your task.
Array/Collection: The object or array you intend to explore.
A Practical Example
Let’s put theory into practice with a real-world example:
$processes = Get-Process
$i = 1

ForEach ($process in $processes) {
    Write-Host "Process[$i]'s Name is $($process.Name)"
    $i++
}
Output:
Process[1]'s Name is ProcessName1
Process[2]'s Name is ProcessName2
...
In this scenario, we’ve declared $processes to hold the results of Get-Process. Our ForEach loop features $process as the placeholder and $processes as the array to iterate through. The action taken is to display the current value of $i along with the name of the current process. We increment $i by 1 with $i++.
Exploring ForEach-Object
While the classic ForEach loop works wonders, there’s a pipeline variation known as ForEach-Object. This version simplifies your code and is particularly handy when dealing with complex commands and piped input.
To employ ForEach-Object, run your desired command and pipe it to ForEach-Object. Then, make use of the special placeholder variable in PowerShell, $_, to manipulate the current element in the array.
Here’s an illustration:
$i = 1

Get-Process | ForEach-Object {
    Write-Host "Process[$i]'s Name is $($_.Name)"
    $i++
}
This snippet accomplishes the same tasks as the classic ForEach loop but offers an alternative approach.
Pro Tip: Storing commands in variables and using the ForEach loop is often my preference. However, ForEach-Object shines when advanced commands and piped input are in play.
Knowing When to Deploy a ForEach Loop
The golden question: when should you reach for the ForEach loop in your PowerShell arsenal? Here’s a rule of thumb:
Use a ForEach loop when:
- You need to perform actions on an array of items;
- Tasks range from deleting specific files to displaying information;
- Your goal is to interact with each element individually, unleashing the full potential of PowerShell’s scripting capabilities.
Exploring the Power of the For Loop
The for loop is a fundamental construct in programming, allowing you to execute actions repeatedly until a specific condition is met. It’s like having a reliable assistant that performs tasks tirelessly as long as certain conditions hold true. Let’s dive deeper into how it works and explore its flexibility and use cases.
Setting up a for loop is akin to orchestrating a performance. You specify when it should begin (init), the condition that dictates whether it continues, and what to do after each cycle (repeat). Here’s the basic structure:
for (init; condition; repeat) {
    Do-Stuff
}- Init: This is where you define the starting point, typically initializing a variable that will be used within the loop;
- Condition: The loop will persist as long as this statement remains true;
- Repeat: After each iteration, this action is executed.
Examples in Action
Let’s delve into an example to illustrate how these components come together:
for ($i = 1; $i -le 15; $i++) {
    Write-Host "This is the color for [$i]" -ForegroundColor $i
}- Init: $i is set to 1;
- Condition: The loop continues while $i is less than or equal to 15;
- Repeat: $i is incremented by 1 after each iteration.
You’ll witness a colorful display as the loop iterates through values 1 to 15.
Unleashing the Flexibility
For loops offer remarkable flexibility. You can specify any or none of the conditions for init, condition, and repeat, resulting in diverse use cases. Here’s an example of a minimalistic for loop:
for () {
    Write-Host "Wheeeeeeeeeeeeeeee!"
}
In this scenario, there are no initialization or repeat actions; it’s a simple loop that continues indefinitely until interrupted (remember, CTRL+C is your friend here).
Furthermore, you can define these elements outside of the loop statement, as shown below:
$i = 0

for (; $i -le 20;) {
    Write-Host "`$i is [$i] iterations old!"
    $i++
}
When to Harness the Power
For loops shine when you need to execute the same set of code multiple times for various reasons. They offer fine-grained control over how many iterations occur. To illustrate this, consider the alternative to the earlier ForEach loop using Get-Process:
$processes = Get-Process

for ($i = 0; $i -le $processes.count; $i++) {
    Write-Host "Process[$i]'s Name is $($processes[$i].Name)"
}- Condition: The loop continues until $i is less than or equal to the number of processes;
- Customization: We modify the Write-Host statement to display information from the $processes array, utilizing the current value of $i. Remember, in PowerShell, arrays start at 0, hence the init as $i = 0.
Understanding the While Loop in PowerShell
The While loop in PowerShell is a powerful construct that allows you to execute a set of actions repeatedly as long as a specified condition remains true. It’s a fundamental building block for automating tasks, and it can be applied to a wide range of scenarios. Let’s delve into the details of how the While loop works and when it’s best to use it.
Loop Setup
Setting up a While loop in PowerShell is straightforward. Here’s the basic structure:
While (condition) {
    # Code to execute as long as the condition is true
}
The heart of the While loop is the condition, which can be any statement or expression that evaluates to either true or false. While the condition is true, the code block within the loop is executed.
Example: Managing Notepad Instances
To illustrate the While loop in action, let’s consider a scenario involving Notepad.exe. We want to open Notepad windows until we reach a specific count. Here’s the code:
$notepad = Get-Process Notepad

While ($notepad.Count -le 5) {
    Write-Host "Starting Notepad, current count is: $($notepad.Count + 1)"
    Start-Process Notepad.exe
    $notepad = Get-Process Notepad
}
In this example, we initialize the $notepad variable with the result of Get-Process Notepad. Then, we create a While loop with the condition that $notepad.Count is less than or equal to 5. As long as this condition holds true, the loop will continue executing.
Within the loop, we display the current count of open Notepad windows, start a new Notepad window using Start-Process, and update the $notepad variable to reflect the updated count of Notepad processes. This step is crucial to prevent an infinite loop.
When to Use a While Loop
While loops are particularly useful when you need to perform actions based on a dynamic condition. Here are some common scenarios where While loops come in handy:
- Process Management: Use a While loop to continuously monitor and manage processes. In the example, we ensured a specific number of Notepad instances were running;
- Job Processing: While loops can be employed to manage PowerShell jobs efficiently. Although this topic isn’t covered in detail here, it’s a powerful use case worth exploring;
- Dynamic Data Processing: When dealing with data that changes over time, a While loop can help automate tasks until a specific data condition is met;
- Continuous Monitoring: For tasks that require ongoing monitoring, such as checking for system resource thresholds, a While loop can be invaluable.
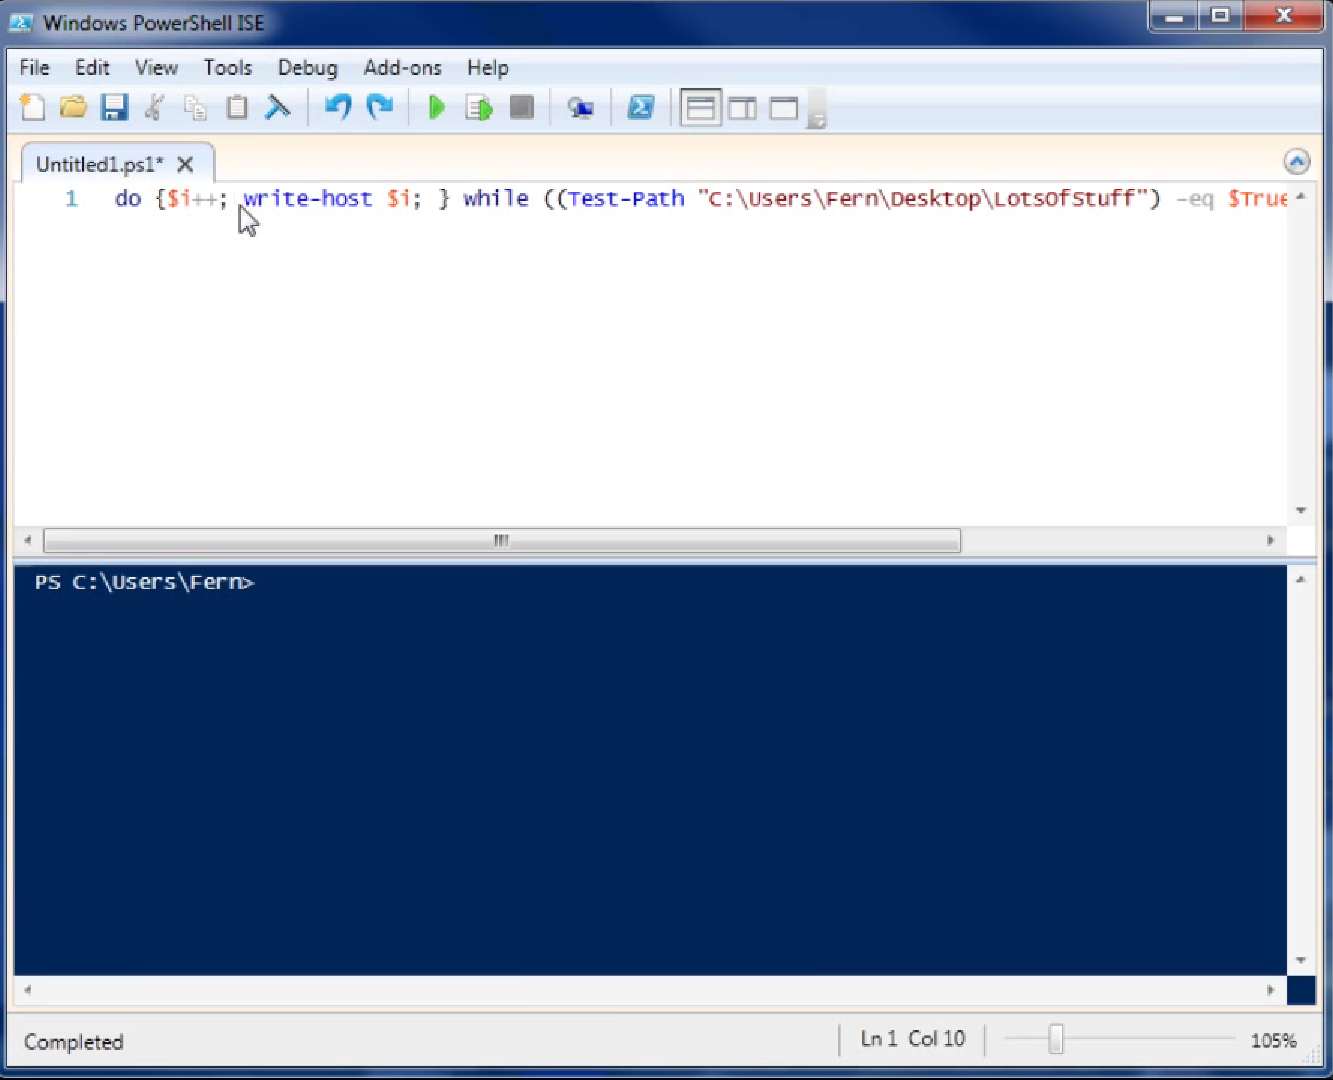
‘Do While’ Loop in PowerShell
The ‘Do While’ loop in PowerShell stands as a pivotal construct, allowing the execution of specific actions as long as a predefined condition holds true. It holds a distinctive edge over the conventional ‘While’ loop, guaranteeing that the actions nested within the ‘Do’ block are executed a minimum of one time, irrespective of the initial condition’s truth value. Conversely, in a ‘While’ loop, actions are bypassed entirely when the governing condition is false from the outset.
Constructing the Loop
For constructing a ‘Do While’ loop, the ‘Do’ keyword initiates the declaration of intended actions, encapsulated within curly braces:
Do {
    Action-Commands
} While (condition)
Here, ‘Action-Commands’ represent the executable actions, and the ‘While’ keyword followed by a condition dictates the continuation of the loop based on the truthiness of the stated condition.
Illustrative Examples
To vividly illustrate, consider an example where the ‘Do’ block’s actions are executed before evaluating the given condition.
Execute the subsequent code, where $i is initialized to 14, as a selection:
$i = 14
Do {
    Write-Host "Executing at least once! `$i = $i"
} While ($i -gt 15)
Here, since $i is never above 15, it exemplifies the unique trait of the ‘Do While’ loop, executing the block at least once even when the condition is false initially.
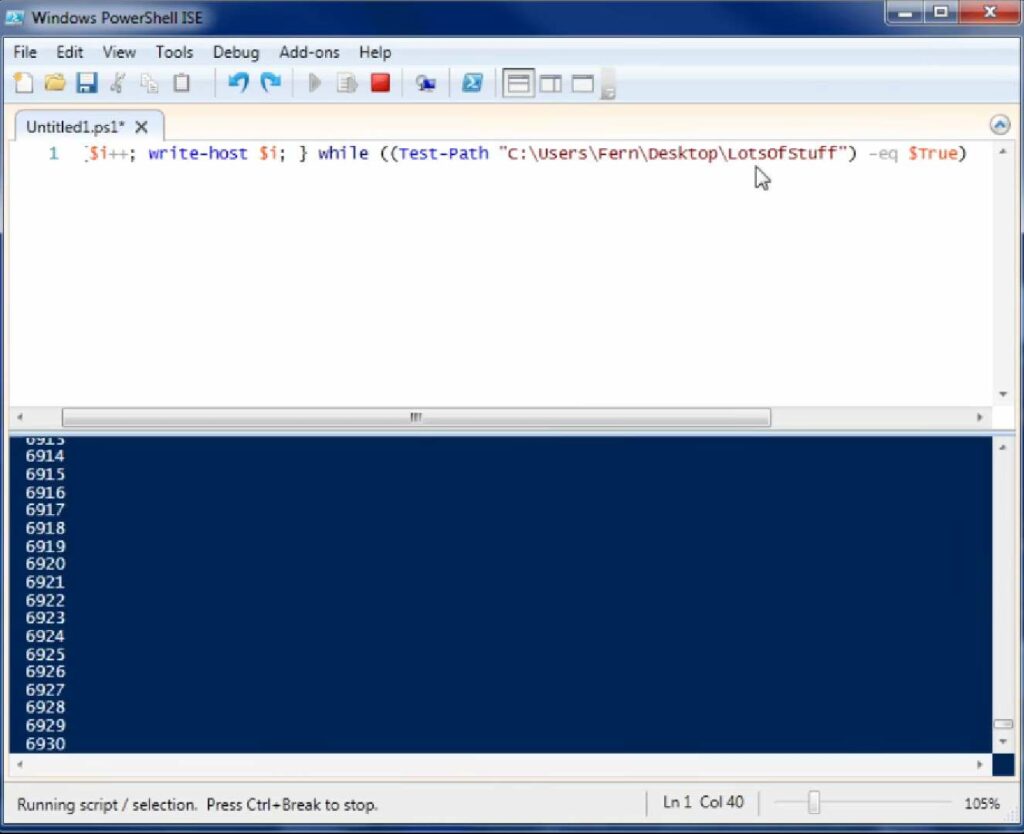
Another demonstrative example can be as follows, where $i is initiated with a value of 0:
$i = 0
Do {
    Write-Host "Iteration in progress! `$i = $i"
    $i++
} While ($i -le 15)
This exemplar continually increments $i as long as it remains below or equal to 15, emphasizing the continuous evaluation aspect of the ‘Do While’ loop.
Practical Applicability
The practical deployment of the ‘Do While’ loop becomes highly pertinent when there is a requisite to execute the ‘Do’ block’s actions at least once, notwithstanding the initial state of the conditional expression. It offers an edge in scenarios where the immediate execution of actions is paramount, even when the accompanying ‘While’ condition is initially untrue. It ensures that the loop’s actions are undertaken before the condition’s evaluation, granting it enhanced utility in scripting scenarios requiring at least one execution of the action block, such as initializing variables or setting up environments.
The ‘Do While’ loop, with its inherent trait of action execution before condition evaluation, emerges as a crucial tool for programmers, enhancing flexibility and offering more granular control in the execution flow of PowerShell scripts. Its meticulous use can significantly aid in creating robust, flexible, and efficient scripts, accommodating varied programming needs and scenarios.
The Do Until Loop: A Detailed Overview
The Do Until loop is a distinctive programming construct, utilized to execute a sequence of commands up until a specified condition is met or evaluates as true. In essence, it functions as the inverse of the Do While loop, providing a method for the automated execution of tasks based on distinct conditional parameters. Although the Do While loop and the Do Until loop share similarities, it is crucial to note that in the Do Until loop, the stated actions will be carried out at least once, even if the condition is true from the beginning.
Structural Framework
The structural representation of the Do Until loop is as follows:
Do {
   Execute-Commands
} Until (Specific-Condition)
This formulation resembles the Do While loop closely, with the primary distinction being the use of the keyword ‘Until’ instead of ‘While’. This subtle change in keyword represents a significant shift in the looping logic and operational execution.
Practical Illustration
To comprehend the Do Until loop’s functionality more profoundly, consider this pragmatic example:
Do {
    $application = Get-Process ApplicationName
    Start-Process ApplicationName.exe
    Write-Host "Launching Application, current instance count is: $($application.Count + 1)"
    $application = Get-Process ApplicationName
} Until ($application.Count -eq DesiredCount)
In this illustration, the code will instigate the specified application until the total count of its instances reaches the predetermined DesiredCount, ensuring the application is launched the exact number of times required. It is vital for the user to execute only the segment of code within the Do Until block, avoiding running the entire script.
This example demonstrates the strategic alteration of conditional parameters using ‘-eq’ instead of ‘-le’. Therefore, the actions within the loop will continue to execute until the condition $application.Count is equivalent to DesiredCount.
Optimal Utilization of the Do Until Loop
While the Do Until loop might not be a frequent choice for every programmer, it holds significant value in certain scenarios. It is ideally implemented when there is a necessity to execute a series of commands repeatedly until a predefined condition is met or a certain value is achieved. These conditions can be as diverse as waiting for a specific process to start running or attaining a particular numeric value in a variable.
The application of the Do Until loop is especially beneficial when the number of iterations is unknown, or the condition depends on external factors or user input, offering flexibility and control over the execution of blocks of code based on dynamic or unpredictable circumstances.
Exploration of Comparison Operators
Comparison operators play a pivotal role in programming and scripting languages, serving as the tools to assess the relationships between different values. They assess and compare the variables or values on each side, delivering a result based on the specific conditions they are meant to evaluate. Below is an exploration of different comparison operators that enable users to facilitate conditional logic, paving the way for more dynamic and responsive programming structures.
1. Equality Operator: -eq
The -eq operator is instrumental in assessing whether two values or variables are equivalent to each other. It is the cornerstone for validating equivalency and is expressed as follows:
2 -eq 2This would yield a result of True, signifying the equality of the two values.
2. Inequality Operator: -ne
Serving as the counterpoint to -eq, the -ne operator evaluates whether two values are disparate. For instance, the expression:
2 -ne 3would return True, illustrating that the values are not equal.
3. Greater-than Operator: -gt
The -gt operator scrutinizes values to ascertain if one is superior to the other. A typical illustration is:
3 -gt 2This would confirm the superiority of the first value over the second, returning True.
4. Greater-than or Equal-to Operator: -ge
The -ge operator meticulously evaluates whether a value is either greater than or equivalent to another value. A representation of this is:
4 -ge 4Yielding True, it confirms the fulfillment of either of the stated conditions.
5. Less-than Operator: -lt
The -lt operator is vital for comparing if one value is inferior to another. An example of its application is:
1 -lt 2This would result in True, indicating the first value’s inferiority.
6. Less-than or Equal-to Operator: -le
The -le operator serves to determine if a value is either less than or congruent to another value. Exemplifying this:
2 -le 2The output, True, denotes the fulfillment of at least one of the criteria.
7. Wildcard Comparison Operator: -like
The -like operator allows for a more flexible approach to comparison by accommodating wildcard comparisons. It proves invaluable when exact matches are elusive. For instance:
'computer' -like '*comp*'This would return True, revealing a partial match within the string.
8. Negative Wildcard Comparison Operator: -notlike
Conversely, the -notlike operator seeks disparities within the string, employing wildcard comparisons. Example:
'technology' -notlike '*techx*'This would yield True, confirming the absence of the specified sequence within the string.
Additional Insights
To delve deeper into the intricacies and functionalities of comparison operators, the following command can be deployed:
Get-Help About_Comparison_OperatorsUtilizing these operators efficiently enables developers to introduce more conditional variety and logic into their scripts, optimizing control flow and improving the responsiveness and versatility of their programs. It is crucial for programmers, both novice and experienced, to understand and master the use of these operators to navigate and manipulate conditional statements effectively within their coding environment.
Conclusion
In conclusion, the “Do-While” loop in PowerShell is a powerful and flexible construct that adds a dynamic dimension to your scripting and automation tasks. It allows you to repeatedly execute a block of code as long as a specified condition remains true, providing a robust mechanism for automating tasks, handling user input, and managing data processing.
Throughout this article, we’ve explored the syntax and usage of the “Do-While” loop, highlighting its key features and showcasing practical examples. We’ve seen how it can be employed to iterate through arrays, validate user input, and address a wide range of real-world scenarios efficiently.
By mastering the “Do-While” loop, you empower yourself with a valuable tool in your PowerShell scripting toolkit. It enables you to create more dynamic and responsive scripts, enhancing your ability to automate tasks and streamline your workflow. Whether you’re a beginner or an experienced PowerShell user, understanding and utilizing the “Do-While” loop will undoubtedly contribute to your scripting prowess.